Gopher Traps: How To
Choose And Use The Best One
Gopher traps work! Anyone Can Do It!
Need To Trap A Gopher? Are you wondering if you might be able to eliminate these rodents from your property? Willing to try anything at this point?
This detailed guide is designed to help you determine which trap will be most effective or the easiest to use.
The basic types of gopher traps fall into several categories. Let's list the candidates, then take a look at each type in detail.
FTC Disclosure:
If you make a purchase via a link on this site, I may receive a small commission on the transaction - at no added cost to you.
Sponsored Links

Wire traps. These can look like a Chinese twister puzzle. They have prongs or claws that squeeze the gopher when tripped.
The original, and best known, is the Macabee. There are many imitations with slight variations on that design.

Box traps. The original was the Red Box Trap, made of wood. This style of trap has also been used to catch moles, rats and squirrels.
A modern replica of that is the Black Box Trap, made of plastic.
They work very similar to each other, using a spring loaded wire bar that squeezes the gopher tight inside the box when it is released.
Black Hole. This is an adapted version of the Box Trap.
It is a plastic cylinder that imitates the shape of the gopher tunnel.
It uses a spring loaded noose mechanism.
Keep reading for explanations of how each of these gopher traps works. This will include advantages and disadvantages to help you select the most appropriate device.
The key to using all of these traps is the proper placement. This knowledge will make a huge difference for everyone. Soon this chore will become less annoying and result in a gopher free lawn or garden.
Success in any attempt to eliminate gophers, regardless of the method or tool used, requires that you locate and use the most appropriate tunnel.
Read more about gopher tunnels in these 2 articles: Killing Gophers and Using Gopher Poisons.
Using Macabee And Other Wire Gopher Traps

The Macabee trap is a unique invention of twisted wire that is designed to close quickly and tightly even in the restricted space of a gopher tunnel. It was created in 1900 and has seen little change in a century, except for using stronger wire (maybe because the gophers were getting bigger and ‘badder’?)
The trap works because the gopher is frequently pushing dirt ahead of himself.
This keeps him from noticing the trap.
By the time the gopher passes the wire prongs or claws, the dirt pushes the trip lever, and catches him around the neck or chest. The gopher typically suffocates from the pressure, although sometimes they get stabbed by the prongs.
The main complaint about wire gopher traps is that they can be difficult to set and place into the runway. This is true. The prongs look a bit threatening to the novice trying to set the trap. The traps can release numerous times when being placed into a small tunnel.
I still prefer the “old reliable” Macabee trap, and there are simple techniques that take care of those concerns. Take a look at this Photo Tutorial that shows the easiest way to set and install Macabee Gopher traps.
You may find an open hole in a new gopher mound with other signs of activity, usually in the early morning or later in the day. The Macabee trap can be used quickly, inserted just a slight distance in this exit runway. Don’t dig or disturb the tunnel. The gopher may be back shortly with a new load of dirt and be quite unsuspecting. That’s the best scenario. It doesn’t happen often.
More commonly, you will need to follow a systematic approach to prove your are smarter than these pint-sized rodents, when you discover new activity, a fresh mound.
Step-by-Step Plan To Infiltrate Enemy Territory:
- Dig down to the main tunnel.
- Wear gloves to keep your scent out of the tunnel.
- Clear most of the loose dirt from the tunnel, in both directions.
- Tie a string to the back end of two traps, about 36” long, and tie it to a stake. (Or just tie 2 traps together with one long string because only one is in danger of being pulled down the tunnel.
- Test the trap in the tunnel for clearance (with the prongs held open), and expand the tunnel slightly if necessary.
- Set the first trap and place it about halfway into the tunnel, resting as flat on the ground as possible.
- Repeat with the second trap pointed in the opposite direction.
- Optional: place a few leaves, grains or raisins behind the traps as bait and to cover your scent. Tomato leaves are great, because of their strong odor and gophers love tomato plants. Or try juicy fruit gum as bait! Read more at Getting Rid of Gophers.
- Cover the hole with a piece of cardboard, a board, rug, or anything that won’t fall into the hole.
- Fill in the cracks under the cover with dirt to keep all light and wind out of the tunnel…???… This is recommended by many resources. I don’t bother. In fact, other gopher traps are designed to let light and wind through, thinking the gopher will come to plug the hole. Try it either way. I just cover it well enough to keep most of the daylight out (and my pets).
- Leave the gopher traps undisturbed for a day. Then lift the cover and check for a body, a sprung trap or signs of dirt movement past the traps. If nothing is changed, leave it alone for another day or two. Move the traps to a new location after 2 or 3 days with no results, or whenever you see a new dirt mound elsewhere.
- If one or both of the gopher traps have dirt pushed around them, pull them out, scoop out the dirt, reset the traps. This time definitely put some bait with the traps, then cover the hole and fill all cracks around the cover with loose soil. This dude will be wary of any openings in his tunnel now.
- When you find a gopher in the trap, you may wonder what you got yourself into. Just think of your dead plants or ruined lawn, and you can deal with it! Wear gloves and press the trap open to release the despicable pest into a plastic bag and dispose of in the trash. Or you can just drop it back in the hole, even push it into the tunnel, and bury it. Some think the carcass will encourage other gophers to avoid the area. I don’t know about that. The ants clean it down to a skeleton in days if you forget about a trap and leave a dead gopher in the tunnel.
- Rinse the trap off with the hose, and leave it out in the sun for a day or two before storing it away. Unless you’ve got more active holes to work on, then it’s Rinse and Repeat!
The wire traps which imitate the Macabee usually function the same way. If they are cheaply made, and the wire is thin, it may be difficult to keep them operational without doing a lot of adjustment.
If they are sturdy, they may work just as well. The Victor 0615 Gopher Trap and one by Sweeney, are good wire traps very similar to the Macabee.
Victor also makes a different design, Victor 0611 Easy Set Gopher Trap Twin-Pack rather lightweight, but easy to set, and less expensive.
The Macabee Gopher Trap MGT is usually only found at retail stores in the Western United States. However, many online distributors offer these traps, if you have difficulty finding a comparable model from your local sources.
Black Box Gopher Traps / Red Box Gopher Traps
Box style gopher traps have also been around a long time. Don’t confuse these with the many varieties of box traps that are typically used to capture different animals live and unharmed, usually for relocating.
The SALAS Wood Box Baitless Gopher Trap is designed to kill the gopher as it is captured in the tunnel.

The original box gopher trap was made of wood and painted red. One current version is made of redwood.
It is not a true box, being open on the bottom and one end through which the gopher enters as he passes through the tunnel.
The opposite end has a hole drilled in it to let air pass through. This is an integral part of the design, explained below.

The new version of this is the Victor 0625 BlackBox Gopher Trap
It is a one-piece molded plastic case with rounded corners (a new, improved form of box trap). This should be a very durable, long-lasting product. It will probably be easier to find at local retailers than the wood box, but both are available on-line at garden supply sources.
Both styles have a stiff wire at the bottom level of the trap connected to a spring mechanism on top of the trap. When the gopher enters the trap far enough, it hits the trip plate. This releases the spring and the wire frame on top of the trap which pulls up the lower wire underneath the gopher. The gopher is caught and squeezed against the roof of the box, so it dies quickly, unable to breathe.
The trap should be placed flush against the dirt that surrounds the tunnel, just like the covered ramp that connects an airplane to the terminal. Box gopher traps require you to dig a larger access hole than wire traps, when being used below ground at the main runway.
Having to dig a large hole (probably 18” across, to fit two traps facing opposite directions) can be very disturbing to people. It’s bad enough having damage from gopher holes and mounds, without making it worse!
When using any kind of trap in a lawn, try to dig out a large piece or two of sod and keep it intact. Plan to reset it back in the hole when you are finished. You might set the dirt and sod in a cardboard box and keep it in a shady area until you are ready for it.
Box gopher traps are a good choice when the gopher tunnel you locate is quite small in diameter. Wire traps may not fit into a narrow tunnel, although you can widen it.
Gophers tend to be very alert to changes in their tunnel, so that could present a problem. Since the box trap fits flush against the soil, and only the wire cross piece lays across the soil, the gopher has little reason to be suspicious.
It is not necessary to use bait with box gopher traps. But if the gopher is not caught, and fills the box with dirt, try again using bait to overcome his bad attitude.
Place some leaves, grass, grain or juicy fruit gum at the back end of the trap, behind the trip lever. One source has been successful putting a few drops of anise oil on the back of the trap. (I wonder if that means they would be attracted to black licorice?)
When the box trap is in place at the tunnel, pack soil around the edges to block a large quantity of light and air from passing. The hole in the back of the trap is all the gopher will sense, and it should draw him in to plug that hole.
When you catch the varmint, simply hold the trap over a plastic bag, press down on the wires above the box, and shake it out. It is best to wear gloves when handling the trap. Then fill in the hole, replace the sod, rinse off the trap, and you’re ready for another round.
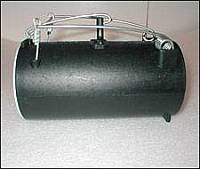
The Black Hole Gopher Trap
“Black Hole” gopher traps are one of the newer additions to the gopher hunter’s arsenal. They are receiving high recommendations for both effectiveness and ease of use.
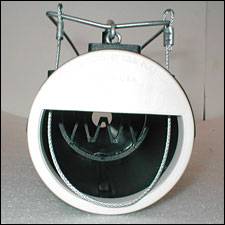
The Black Hole trap is a cylinder, open on one end with a hole in the opposite end. It functions the same way as the box trap, with a spring mechanism on top. However, it uses a steel cable as a noose instead of a rigid wire to catch and squeeze the gopher.
Use the Black Hole in the same manner as the box traps, with this exception. The box traps have no bottom, so the gopher never feels anything under him. The gopher could be disturbed by the hard plastic of the Black Hole. Some people place a small amount of loose soil inside the cylinder on the bottom to simulate the tunnel floor.
The Black Hole trap has the advantage of being a bit easier to maneuver in a tight space. This may allow you to access the main runway with a slightly smaller hole. Pack soil around the front to seal any cracks, and at the sides to keep it from moving.
Also, these gopher traps fit very nicely in the diggings of a new mound, where a lateral tunnel exits the ground. Just remove enough dirt to allow the cylinder to rest even with the tunnel ramp, but have the front of the trap completely buried. Leave the hole in back exposed.
This trap and the box traps have the same trigger mechanism, which operates the same as a mouse trap. A bar passes over the spring loaded assembly, and is latched to the trip plate.
Sometimes you may have to do some adjustments on the bar and trip plate to keep them lined up so they will hold in place, yet remain sensitive and release easily.
If you set these Black Holes or the box gopher traps in a hole, and then cover the hole with a board for safety, be sure there is enough clearance above the trap for the bar and spring to release with no obstruction above them.
The Black Hole Gopher Trap has been manufactured in the past for Dexol, Victor and Woodstream. The patent currently appears to be held by the latest Merger King, yet the product name never changed, so you may find it locally under any of those brand identities.
Deciding On Gopher Traps -
A Recap & Final Hints
All of these styles work well. It is really a matter of preference which you choose. The Wire Traps tend to be less expensive. If you need to have multiple pairs for protecting a large area, that may be a good choice. They don’t require you dig as large a hole as the other traps, if that matters in your situation.
The Black Hole is easy to set and versatile in it’s application. It resembles the shape of the gopher tunnel, which could make the gopher less likely to notice a change in his surroundings. It is probably the more expensive of these traps.
The Box Traps are an old dependable style. Simple and functional, but large and clunky. If you want the least confusing style without spending extra money, this is a good choice.
Now for a few words of encouragement:
- Some gophers seem to sense a trap and pack them with dirt. That happens to any of us, so just keep trying, with the changes or suggestions mentioned above.
- Consider investing in more than one type of trap. That gives you an option to fool the gopher when you have a smart one that defies capture.
- It pays to get started right away when you see a new dirt mound, rather than ignore it. Avoid the possibility of a new litter being born. Prevent more damage to your lawn. Attack them quickly and with persistence. The process becomes easier, the more times you use the traps.
- Increase your chance for success on the first try by using two traps at once, in the main runway.
- Using gopher traps is a nuisance and it can be dirty work. But it is worth the effort. It is to be commended over using poisons, which have long-term effects that we would all prefer to avoid if possible. You are doing a good thing!
Make your choice now, get your traps, be prepared!
Read the other articles about gophers, if you haven’t already done so. This will give you a more balanced perspective on the task ahead of you.
Be smart, and Happy Hunting!
Editor's update, March 2010,
regarding difficulty in finding certain gopher trap models.
The traps mentioned in this article are typically available in most retailers' garden departments and at many nurseries (except the Macabee is often scarce, as mentioned earlier). From time to time, a certain model is in short supply.
An example currently is the Black Hole Gopher Trap. I suspect that it's popularity is increasing as more and more people are experiencing success with this uniquely designed unit. I receive many comments from people that they are pleased with their results. Here's an example:
Reader: After weeks of gopher anguish I found your site after searching "how to kill a gopher". I followed your tips and instructions and caught two in two days with my black hole trap. My flowers and I thank you! Did you know gophers love California poppies? -- Lynne, March 5, 2010
Reply: They've pulled tomato and lettuce plants down into their hole right in front of me! -- but they didn't survive long enough to get indigestion from 'eating the whole thing' - nabbed them within hours with my macabees! -G.C.
Jan, 2011 -- Currently, all sources seem to have ample supplies, so we can keep the upper hand!
Though I like to tip the odds in my favor by using two traps, pointed each direction in a tunnel, if you don't want to invest in two at this time, that's o.k.
Just expect that there's a 75/25 chance that the gopher will come at it from the back side. (The law of averages, + Murphy's Law, gives the gopher the advantage!) Never fear, you will get him on your next attempt!
Let me know if you encounter any interesting developments during your adventure! Maybe we can compile a fun article, "The Harrowing Exploits Of The Gopher Hunters!"
Go to How To Get Rid Of Gophers for basic information, and a listing of all the Gopher Articles available now.
Go to My Garden Needs: Pocket Gopher Control, for a storehouse of suggestions, available through Amazon
Go to Top of Page
Sponsored Links
BRING ON SPRING!
A Stronger, Greener Lawn
Starts Now...
with help from DoMyOwn
Products * Videos * Schedules * Guides


