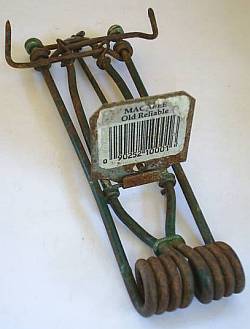
Macabee Gopher Trap:
Too Complicated? You Need...
The Macabee Gopher Trap Tutorial
with Free Instructions and Photos!
Look at a Macabee gopher trap and have instant second thoughts?
Gopher traps are one of the most efficient ways to control a gopher problem. Of all the styles available, the Macabee twisted wire trap is held in highest regard.
It is called “Old Reliable” because it works...
...IF... you can get it set and get it in the gopher tunnel!
Are you one of the many people who have gotten frustrated trying to set a Macabee gopher trap without catching yourself?
It is a simple design, yet it looks confusing. It intimidates many would-be trappers, because it looks like a puzzle.
Today you can learn a simple approach to setting these gopher traps. Tomorrow you can start carving notches in them every time you trap a gopher!
FTC Disclosure:
If you make a purchase via a link on this site, I may receive a small commission on the transaction - at no added cost to you.
Sponsored Links
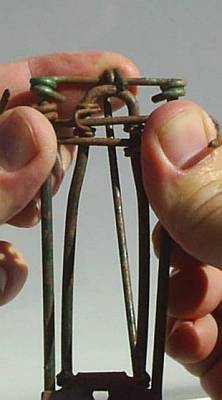
Let’s start with a few essential points for understanding and using the Macabee gopher trap.

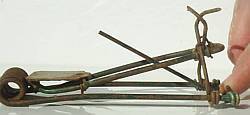
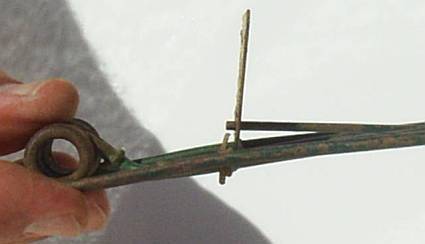
Refer to the photo on the right for terminology used throughout the tutorial.
After a few Do’s & Don’ts, you will see two series of pictures, each showing a different angle or approach.
This should give you the guidance and confidence you need to successfully use this practical tool.
(Note: the ugly model for these pictures is a tried-and-true, field tested unit that has been in use for many years, just to show you that they can, and do, work quite well!)
Three Basic Points For Setting The Macabee Gopher Trap
First, the Macabee trap does NOT work like a mouse trap. On a standard mouse trap, the wire goes over the spring-loaded bar and holds it down when fastened to the trip plate.
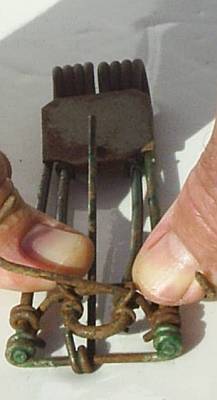
On the Macabee gopher trap, or similar imitation models, the Rod which holds the gopher trap open comes up through the bottom. See the photo and always start with the loose rod in this position.
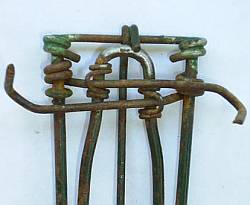
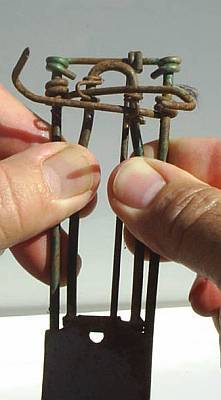
Second, the twisted end of the Rod has a little stump exposed, and this is the part that holds the trap open. Let’s call it the Catch, as it will catch over a Loop when the Prongs are pushed open.
Notice at the top, the Catch does not completely go across the Loop. In fact, it looks like it doesn’t extend far enough to adequately hold the Loop down. But that is the design. It doesn’t take much to hold these types of gopher traps open, and you want it to release quickly and easily.
Third, it is best if you do NOT bend the Rod, the Loop, the front, the sides, the back… Do not grab a pliers and start making adjustments when you can’t get it to work.
The Macabee gopher trap is hand made and designed to work, IF you maneuver the pieces correctly.
If you start to adjust one piece of wire, you may affect the tolerances at the critical points where the Catch holds the Loop down, or the Trip Plate holds the Rod down.
You may have difficulty at first. The more you set the trap, the easier it gets. There are a few tricks to know, and these will be shared with the photos that follow.

|
|
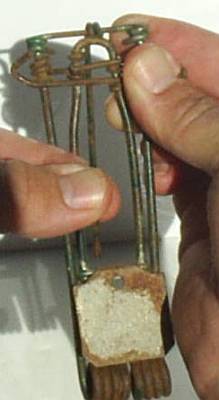
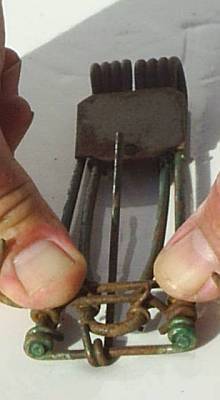
| Place the Rod up through the bottom of the trap. If it seems too long to clear, slide the Catch to the side and angle the rod till it clears and sits above the Trip Plate. Finish with the Catch slightly to the right of center, so it will have clearance as the Loop comes down. Next, practice opening the trap in Step 2. | Position your thumbs close to the front of the trap, then press down on the bars that force the Prongs apart. Open and close the Prongs a few times to get the feel for the spring action. Pay attention to where the Catch lines up with the Loop. Release the prongs and maneuver the Rod and Catch to the best position. |
|
|
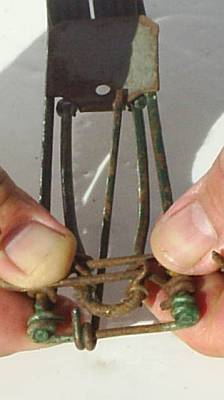
| Ready? Press down with both thumbs on the bars to spread the Prongs. Keep the bar pushed down with right thumb while sliding left thumb up the left Prong and squeeze it open tightly. Then move your right thumb over the right Prong and squeeze it. You now have good control over the spring. If the Catch is stuck under the Loop, reverse these steps, move the catch and try again. | Now, the trick is to place your right index finger all the way at the top corner to gain leverage. Press down with your thumb and make sure you have good control over the spring action. Then release your left hand, grab the rod in the center and move it up & around in a way that allows you to position the Catch over the Loop and as close to the center as possible. |
|
|
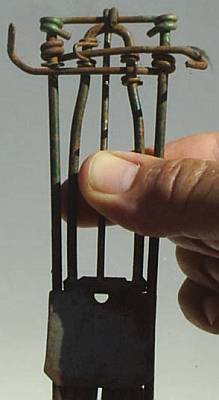
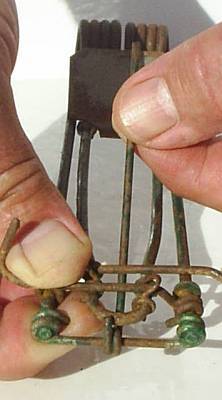
| Press down on the Rod with your left thumb (as in previous picture) and see if it will hold the Loop down... No? Reposition the Catch more to the center... Yes? Then keep pressure on the rod, and remove your right thumb from the Prong. You can now hold the rod down with either hand and keep the trap open quite easily. | Grab the Trip Lever with your free thumb and finger and pull it up into place. Maneuver it so the Rod will pass through the hole. Push the Trip Lever all the way forward at this point for safety. Most twisted-wire gopher traps will operate very similar to this version. |
|
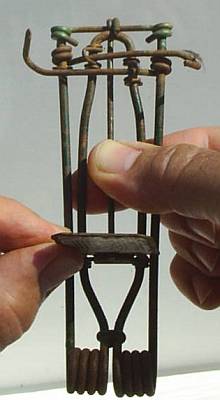
| This shows the Rod sticking through the hole with the Trip Lever all the way forward. It will trip fine even with this much Rod showing. If you want to adjust it closer, wait until you place the trap in the tunnel. |
|
| When placing the trap in the tunnel, place your thumb over the end of the Rod, and press it against the Trip Plate. Pushing gopher traps into the tunnel can bump the Plate and spring the trap. Keep your thumb in place until the trap is situated. Then carefully slide the Trip Plate to the position you wish on the Rod. |
Don't Panic! There's More Than One Way
To Set A Macabee Gopher Trap
It may seem awkward to maneuver the parts of the Macabee gopher trap as you concentrate on getting the prongs open without pinching your fingers. I encourage you to keep playing with it. Try holding it with different finger positions. Try using different fingers to slide the Catch or the Rod into position.
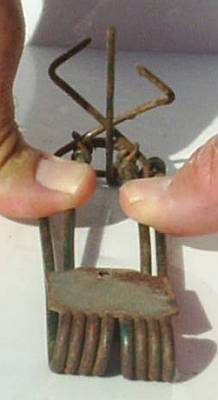
If it is difficult to squeeze the prongs open, some people find it easier to lay the gopher traps on a solid surface, and press down from the top. The following series of photos will demonstrate this approach.
|
|
|
Place the Macabee gopher trap on a flat surface, with the Rod pointing up from the bottom. Pressing down on both sides will open the prongs with less struggle than holding the trap in your hands. Starting with the back of the trap closest to you (as shown) makes it easier to move through the remaining steps.
However, the following photos are presented from the front of the trap to better illustrate what is happening. |
Notice the position of the Catch. It is off center enough to allow the loop to come down and pass next to it. Because the Catch is pressed between the table and the crossbar that holds it in place, it cannot be moved easily as you are opening the prongs. If the Catch is right in the middle it will probably interfere with the Loop coming down all the way. |
|
|
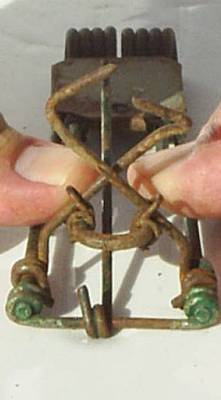
| Press down as far as possible, then slide your left thumb over the prong. (On the right side in photo -- remember the image is reversed from how it will appear it front of you.) Notice it appears that the Catch is sitting just clear of the Loop on one side. If it were in the middle, the Loop would not move down far enough, and the Catch would be stuck under it. | Slide your right thumb over the Prong and press down firmly. Notice how the Catch is starting to rotate over the Loop at this point. If the Catch is positioned this well, you may be able to press down on the rod now with your left hand, and the trap will be held open. If not, try holding the trap open using only your right thumb, and see if you can maneuver the rod enough to move the catch in place. If that is not possible, go to the next step. |
|
|
| It may be necessary to pick up the trap at this point. Carefully slide your fingers under one side at a time, as you keep enough pressure with your thumbs to hold the Prongs open. If you start out with the trap at the edge of a table, it may be easier to slide your fingers under, or slide the trap off the edge. | When you have a good grip on the trap, continue holding the Prongs open with your right hand, and use your left hand to manipulate the Rod and maneuver the Catch into place over the loop. Proceed to finish setting the trap in the manner of the first tutorial. |
Practice setting gopher traps enough times that you are comfortable with how they work. If you continue to struggle, have someone maneuver the Rod and Catch into position while you hold the prongs open.
Since the Macabee gopher trap is hand-made, there can be some variation in individual units. This may cause a slight difference in the best place to align the Catch over the Loop.
Exception to Rule #3 ("do not bend"): If the Catch seems too close and tight to maneuver over the Loop, or the trap gets stepped on and distorted, you may need to do some adjustment. The best place to do this is to pry the cross bar at the front of the trap slightly farther away from the Loop. Just do a little at a time, till the Catch is able to move into position and stay.
Good Luck and Happy Hunting! Gophers can be conquered! RELATED ARTICLES Choosing And Using Gopher Traps
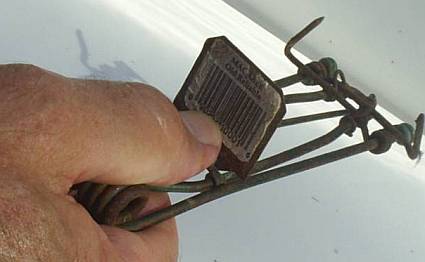
Looking for a source for the Macabee gopher trap? Yes, it is frequently an item difficult to find at retailers in most parts of the country. The family business that has making these for over 100 years is a single source which only puts out so many of them. The quality of each unit is their trademark. So shortages are not uncommon as some distributors find their supply rationed.
Make The Macabee Gopher Trap
Earn Its Keep and Start Catching Gophers!
Learn more tips about all methods of gopher control, including how and where to use your Macabee gopher trap, or other styles, in one of the following articles.
Go to Top of page
Go to Home Page of Lawn Care
You can typically order them through the Amazon network of suppliers at this connection. (Don't forget that most of the time you want to use two traps in tandem, so this just about qualifies you for free shipping from them if you don't already use Prime Shipping.)

BRING ON SPRING!
A Stronger, Greener Lawn
Starts Now...
with help from DoMyOwn
Products * Videos * Schedules * Guides


